Creating a Case from Change Healthcare PACS Workstations
For Change Healthcare PACS Users:
Study Share and Change Healthcare PACS are integrated to provide an efficient workflow for creating cases. To use this feature, add the Study Share button to your PACS main toolbar. For assistance with adding the button, please contact your local PACS administrator.
To create a case:
- In PACS, open the studies containing the images that you want to send. You can send flagged images from any number of studies at once, as long as they are open in PACS at the time you create the case.
-
Choose which images you want to send. If all the images you want to send are already flagged in the open studies, then proceed to step 3. Otherwise, identify the images to send using one of the following methods:
-
Select images without flagging them. For each series containing images that you want to select, do the following:
- Hold down the Ctrl-key and click the series to open it,
- Release the Ctrl-key
- Use the scroll wheel to navigate to a desired image
- Hold down the Ctrl-key and click the image to select it. When an image is selected, the viewport displays a yellow outline around the image, and the corresponding chit is highlighted in the series index bar.
- Repeat the above steps for each image you want to select. Hint: be careful to hold down the Ctrl-key when clicking on a series to view it, or when clicking on an image to select it; otherwise, all previously selected images will be deselected, and you will need to start over. Also, be careful to release the Ctrl-key when scrolling between images.
- Alternatively, you can flag additional images by navigating to each desired image and pressing the space bar. A flag icon will appear on the image, and a red mark will appear on the corresponding chit in the image index (chit bar). Note: you should unflag the images (using the space bar) after performing the send, unless you intend for the flags to remain part of the study.
- Select New Case from the Study Share dropdown menu. This will launch the integrated Study Share case authoring form.
- Optionally, select an existing case for your images. If cases already exist that match the current patient, a window will appear giving you an option to select one of these cases:
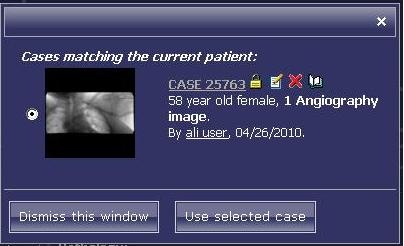 Just select the radio button next to the case you want to add images to, and then click “Use selected case.” The Integrated Case Authoring Form will then appear, and all of its fields will be automatically populated with data from your selected case. If you do not want to use one of the existing cases, just click “Dismiss this window.” You will then be able to add your images to a new case. Note: you will only be able to select from the 4 most recent cases that match the patient.
-
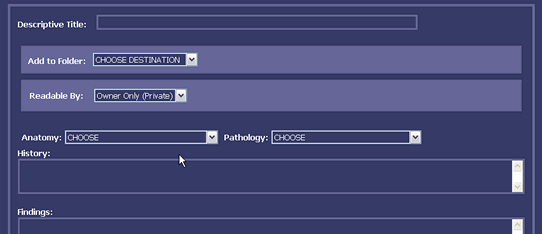
Fill in the Integrated Case Authoring Form:
- Confirm which images you want to include. Check the checkbox of each study whose flagged or selected images you wish to include.

-
Enter additional fields. You can fill out as much or as little as you like, and you can always edit your case at a later date. Fields marked by an asterisk are required, depending on the configuration set by your Study Share administrator. Modality, study information, and patient information are automatically populated from the DICOM header fields. Patient identifiers are included for your reference, but they will not be visible by other users unless you grant them write-permission on your case. Additional fields that you can enter are:
- Case Title: a descriptive title for the case.
- Folder: this option lets you add a bookmark to the case in a folder, such as the weekly conference folder. The dropdown list contains all folders that you can write to. You can create additional folders from inside Study Share.
- Case Permissions: Cases can be private, public (viewable by all users), or visible by a group.
- Anatomy and Pathology Categories: These determine where your case is found when users drill-down through categories to explore the case repository.
- Case Text: Type or paste in text from the report. You can enter History, Findings, Diagnosis, Discussion, etc.
- Submit the form and view the case. Press ‘Save Case’. The images will begin transmitting from HMI to the Study Share server. When all case images have been sent over, the case will be automatically displayed. If you prefer not to wait, you can click the link to view the case at any time, but it may not contain all the images yet. You can refresh the case viewer to see additional images. Note: after all key images have been sent, the rest of the images from each series will be retrieved in the background. This gives users the option of viewing the full series from inside Study Share.
Next:
Preparing to Create a Case