You can choose to export only the images from a case, which can then be used in other contexts such as embedding them into your own documents. You may only export cases which are writable by your account.
Exported case images will be packaged in a Zip file which enables you to download multiple files in a single operation. Most computers come with software for handling Zip files. Some systems may require utility software to be installed. If your computer does not recognize the file type (e.g. if it asks you to indicate which application to use), you should download and install Zip software or talk to your systems administrator.
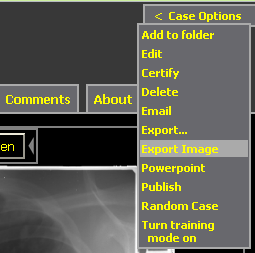
You can export a single image from a case in its original format via the Export Image option in the Case Options menu.
This will open a new window to request the image you were currently viewing in the Case Viewer.
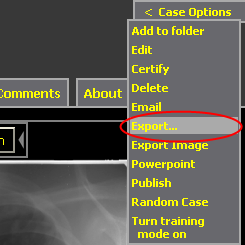
You may export a case if you have write permissions on that case. To export a case:
Note: if the Export link does not appear, you may not be logged in, or you may not have write privileges to the case.
The export form should expand, displaying options for which images will be exported, along with their size and format. You can choose to export only specific images, or every image in the case.
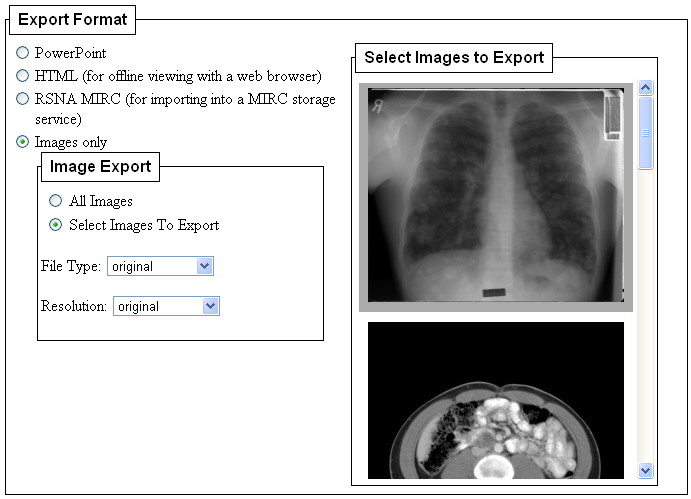
By default, only the image you were currently viewing in the Enhanced Case Viewer will be exported. Clicking an image (or its caption, if a small version of the image is not currently available) will toggle its inclusion in the export.
You can skip the selection stage by selecting “All Images” in the “Image Export” field set. This will hide the selection view and include every image in your export.
Images will normally be exported in their original size and format. Available format options include:
Selecting “TIFF” will show an input to select normal or ZIP compression for exported TIFF images. Some operating system default viewers do not understand normal TIFF compression. If you are unable to view an exported TIFF image, try to export again with ZIP compression.
Selecting “Animated GIF” will show an input to control the animation delay, which is the number of seconds to pause when displaying each frame of the animation.
Available size options include:
The sizes provide a “bounding box,” and the image will be resized so that it fits within that bounding box. The height and width ratios will be preserved to avoid distortion. For example, a 1600x1200 image exported with size 512 will be 512x384 pixels in size.
The default sizes are reasonable for many image uses, but custom is useful for situations where the default is not sufficient. It will expand the form further, providing text fields for you to provide a DPI and size in inches.
Note that the system does not support exporting images to a size with more than 16,000 pixels along each edge.
Extract the ZIP archive into a location on your hard drive. Be sure that that all files are being extracted. The cases will be extracted to a folder in the location you specified. The new folder will have a name that starts with “mypacsExport…”
You can save this folder to any portable media, such as floppy disk, CD-R, or USB drive.
To view the extracted case, open the folder whose name starts with “mypacsExport” (you’ll need to navigate to wherever you saved the folder, such as your Desktop or a floppy disk).
Double-click any image to open it in your operating system’s default image viewer.
To export multiple cases at once, add them to a folder, and then export the contents of the folder:
Note: if the Export Folder link does not appear, either you do not own the folder, or the folder contains no cases which are writable by your account.
You should see a form identical to the one described earlier for exporting cases. Decide size and format, specifying custom values if needed, then press “Export Folder.”
This will export all cases in the folder that are writable by your account. The process may take a long time if the folder contains many cases. Note: if the folder contains cases which are not writable by you, they will be skipped.