If your PACS workstation or modality is configured to send studies to the teaching file server, then you can avoid having to export files and upload them as separate steps. See the section Preparing to Create a Case for more information. Once a study is in the teaching file’s DICOM queue, you can access the study from within the Enhanced Case Editor, browse the stack of images, adjust window/levels, and add selected images to the case.
If you have not already launched the Enhanced Editor, do so by clicking Create — New Case in the main menus or clicking “Edit” in the Case Options menu for an existing case. The “DICOM” tab loads first. It may take several more seconds for the rest of the tabs to finish loading, during which time tab lettering will be light gray and not respond to clicking.
After the DICOM tab has loaded you can search by first name, last name, patient number, or accession number. You don’t need to enter the entire name or number-- you can search by prefix. For example, “Jo” in the last name field will match “Jones” and “Johnson.” Note that you will not be able to query the PACS directly-- you must first push a study to the teaching file’s DICOM queue before you can access it here.
Press “Search” to send the query. Alternatively, you can click “show all series” to view everything that has been pushed to the teaching file. Results will be listed by patient in the order they were received in the queue (most recent appearing first). Under each patient is a list of exams, showing the accession number, exam description, and exam date. Under each exam is a list of series, showing series number, size, and the date and time the series was pushed to the teaching file server:
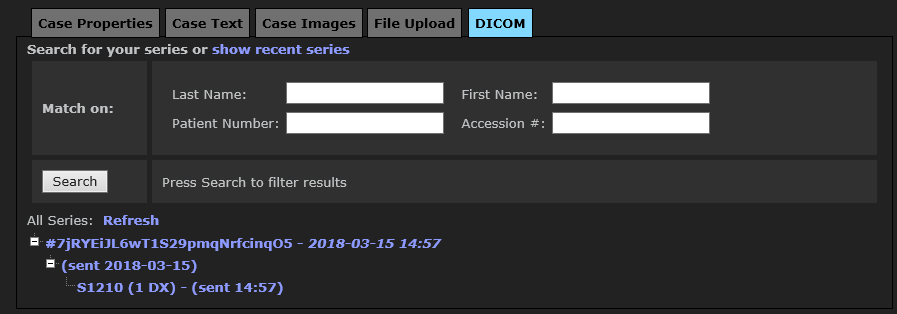
Click on a series to load it into the browser and launch the DICOM viewer.
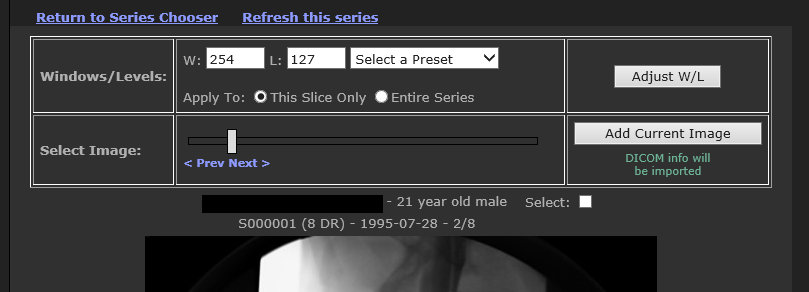
The DICOM viewer supports the following operations:
Scroll up and down through the image stack: position your mouse over the image and use your scroll wheel. You can also click previous/next or drag the slider control. The response time may seem slow when the images are first loading, but after a few seconds you will be able to scroll through the stack smoothly.
Adjust the window/level: enter new numeric window/level values in the text boxes and press “Adjust W/L". To increase contrast, enter a narrower window value. To increase brightness, enter a higher level value. Use the radio buttons to specify whether to apply the new W/L to the current slice or the entire series. If the series is large, it may take several seconds for the entire series to be adjusted. You can also use the presets in the dropdown menu if any are available (currently, only CT presets are supported). You can return to the original W/L settings using the “Image Defaults” preset.
Add an image to a case: scroll to the image you want to add, adjust the W/L if desired, then press “Add Image to Case.” The Editor will immediately switch to the Case Images tab. After a few seconds, the new image will appear in the tab above any existing images. You can then enter a caption. See Managing Case Images for more options. If you want to add additional images, click on the DICOM tab and repeat the process.
Import DICOM information into case properties: when you first add an image to a case from a DICOM study the patient information contained in the study header automatically gets populated in the corresponding Case Property fields.
Next: Managing Case Images