
Images in cases come from many different sources and formats. For optimal viewing in a web browser, the teaching file server automatically converts images to JPEGs in several standard sizes.

This section describes how to resize images, view images only, retrieve images in their original format, and save images to your hard drive.
Images may be imported from multiple sources, having vastly different dimensions. For example, a CT image may be 512x512 pixels, while a digital photo of a chest x-ray may be 1600x1200 pixels. To make images appear uniform, the server automatically generates standardized copies of every image. Images are stored in the following sizes:
- Small - 256 pixels wide
- Medium - 512 pixels wide
- Large - 1024 pixels wide
- As Submitted - the original dimensions of the image
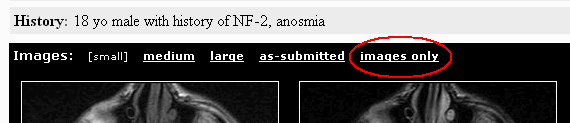
To select the size for your images, simply click on one of the four size labels above the images:

The page will be reloaded with the new image sizes. The size you choose will be "sticky" during your login session: all case images will appear in that size until you log out or change it again.
To reduce ambient light and create a more favorable environment for viewing fine details in the images, you enter "images only" mode by clicking on any image, or by clicking "images only" to the right of the size controls:
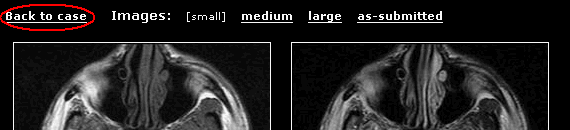
This will display the images and captions on a dark background, without the banner or the rest of the case text. Once you are in this mode, if some images scroll past the bottom of the screen, as an alternative to using the scroll bar you may click on any partially visible image to bring it into full view.
To return to the case view, click on "Back to case":
If an image has a link "view series" in the caption, you can view the DICOM series from which the image originated. The link only appears if the series is available in the teaching file's DICOM queue.
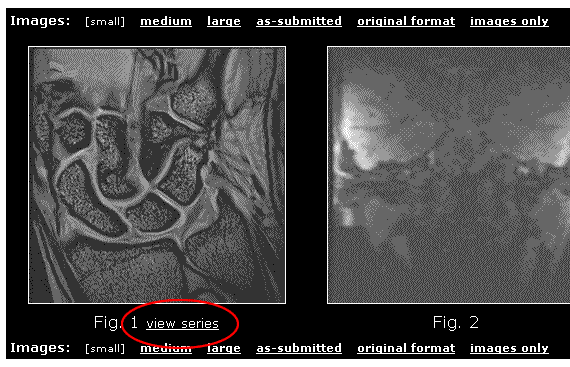
Click the "view series" link to launch the DICOM viewer in a new browser window.

The DICOM viewer supports the following operations:
Scroll up and down throught the image stack: position your mouse over the image and use your scroll wheel. You can also click prev/next or drag the slider control. The response time may seem slow when the images are first loading, but after a few seconds you will be able to scroll through the stack smoothly.
Adjust the window/level: if the window/level controls appear, you can enter new numeric window/level values in the text boxes and press "Adjust W/L". To increase contrast, enter a narrower window value. To increase brightness, enter a higher level value. Use the radio buttons to specify whether to apply the new W/L to the current slice or the entire series. If the series is large, it may take several seconds for the entire series to be adjusted. You can also use the presets in the dropdown menu if any are available (currently, only CT presets are supported). You can return to the original W/L settings using the "Image Defaults" preset.
Although the case images are always displayed as JPEGs, the server does keep the original uncompressed files. These can be retrieved by the case author at any time. While viewing your own cases, you will see an additional control called "original format" to the right of the size controls.

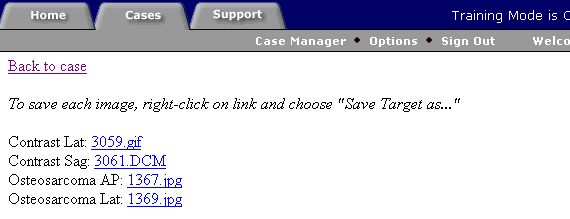
The format of each file is evident from the filename extension (for example, "3061.DCM" is a DICOM file). To retrieve a copy of one of the images in its original format, right-click on the filename and choose "Save Target As...".
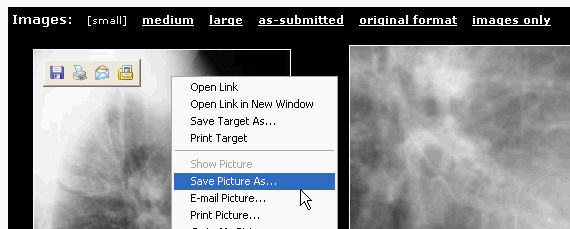
You may want to save copies of case images to your hard drive for use in external software, such as a Powerpoint presentation. If your system allows it, follow these steps:
- Click on the desired image size (e.g. "medium")
- Right-click on the image you want to save.
- Choose "Save Picture As..." or similar option from the browser popup menu.
- Specify a destination on your hard drive for the image file.
Some systems are configured to disallow saving images from cases that you do not own. If your system adheres to this restriction, you will be prevented from saving images unless you own the case.
Next: Using Training Mode