Before uploading files to a case, you need to have those files accessible on your hard drive and ready to upload. This may involve exporting images from your PACS, taking a screen capture, or emailing the images to yourself. Images can be in any common format, such as JPEG, GIF, PNG, PSD, TIFF, Bitmap, or DICOM. Please see Preparing to Create a Case for more information.
Click on the "File Upload" tab:

If you are creating a new case with the Classic Editor, submit the case then click the link "Add Images to this Case". Or if you are editing an existing case, launch the case editor and then click "Add Images".
To specify the location of an image to upload, click the first Browse... button, which will launch a File Upload popup:

This popup window may look slightly different from the one displayed above, depending on your operating system. You will see either thumbnails or icons representing the files in a folder on your hard drive. To look in a different folder, click the folder name (e.g. "file formats" in the example above), and navigate to the desired folder from the drop-down tree menu:

You may optionally enter a caption for the image. The caption may simply identify the image parameters (e.g. "Axial Pre-Contrast T1"), or you it can include a paragraph describing the findings in the image. The caption will not appear when the user is viewing the case as an unknown during Training Mode, so it is safe to include findings in the caption. You do not need to enter a figure number, as those will be automatically generated.

Repeat these steps for each image that you want to upload, then press "UPLOAD". Only click UPLOAD once. It may take several minutes for the images to upload, depending on the size of the images and the speed of your network connection.
In the Enhanced Editor, when you click Upload you are switched to the Case Images tab, and the new images are displayed as soon as they are uploaded.
In the Classic Editor, when you click Upload the form page refreshes with a view of the case containing the new images.
If your computer is able to run Java applets, you can also upload multiple images or an entire folder of images. Click the "multi-image upload applet" link:
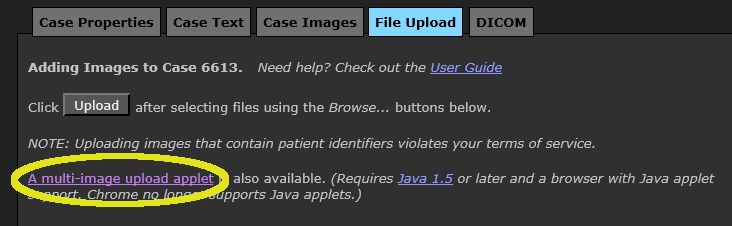
After you click the link, it may take up to 30 seconds for the applet to download and run.
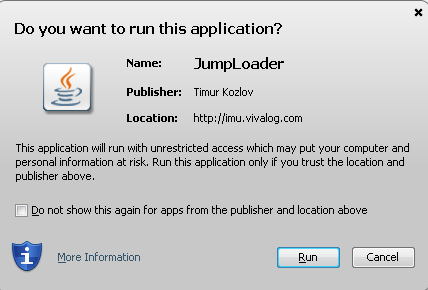
If a security window pops up asking if you want to trust the applet, click "Run":
The applet will open in a new window:
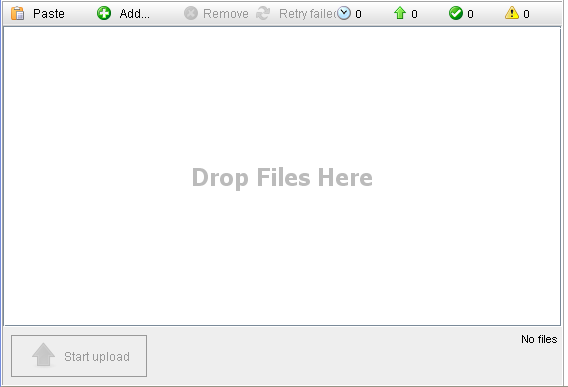
Add files to the uploader with any of these methods:
- Drag and drop: Drag files or folders into the area labeled "Drop Files Here".
-
 Copy and paste: Copy an image to the clipboard and click the Paste button (or press Ctrl-V).
You can copy images from the file system, from within an image editor, or with a screen capture utility such as Cropper or Snagit. PC users can even use the Print Screen key to capture their full screen.
-
 File browser: Click the "Add..." button to open a file browser, where you can choose files to upload.
If you want to upload the entire contents of a folder, navigate to the target folder's parent folder, then single click on the target folder and click "Open".
If you prefer to add some but not all of the contents of a folder, open the folder, then hold down the Ctrl key while you click each of the target files to be uploaded. Then click "Open".
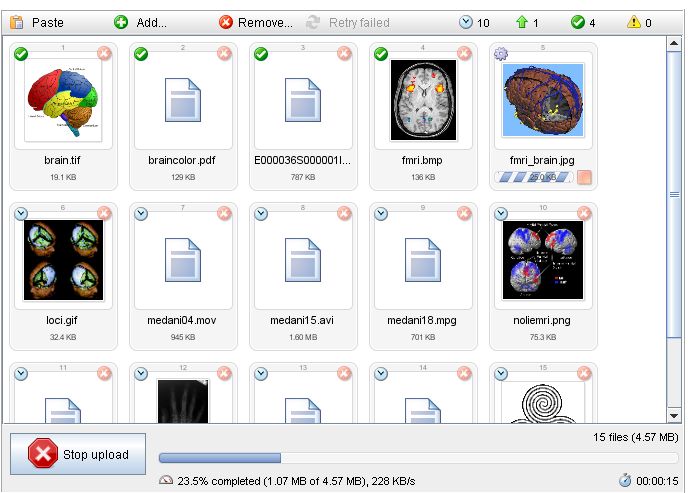
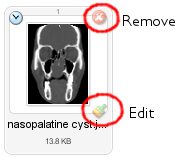 The uploader will show a thumbnail or icon for each image waiting to be uploaded.
To remove a specific file from the uploader, click its Remove button (upper right).
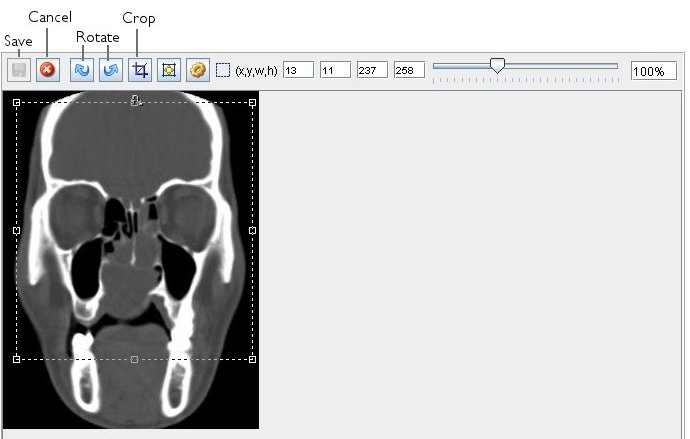
To edit an image before uploading, click its Edit icon (lower right). This will open an Image Editor window (see below), where you can rotate and crop the image. This may be useful if you need to crop a screenshot taken of your PACS system.
After making your changes, click Save (to keep changes) or Cancel (to abandon changes).
To begin uploading, click the Start Upload button:
![]()
The applet will show you its progress as files are uploaded:
While waiting for files to upload, you can continue working on other sections of the case in the main Case Editor window. The Case Images tab will update automatically as images are uploaded.
See the section Managing Case Images for instructions on how to add captions, reorder the images, and control when they are displayed.
Next: Adding Annotated Images